Wall System: R-45
The Thermal Envelope
A net-zero home’s super insulation system can be designed in a variety of ways depending on one’s goals. We asked our architect to design an exterior wall system within our budget that would be thinner than the 21-inch thick wall systems we had seen. We reasoned that thinner walls would maximize interior space, and shallower window openings would allow sunlight into the house more easily. Lucas was able to get our wall system down to 14.5 inches thick.
The structure’s framing is traditional 2x6 stud wall construction. What's unique about our wall system is the building’s south shear wall and the integral layers on either side of the 2x6 framing.

Tim in the newly framed front door!

The wall system begins with traditional 2x6 inch stud framing.
Shear Wall & LVL Beam Framing
To fortify the south wall, with its 200 square feet of window glazing, the engineer specified two 20-inch laminated veneer lumber (LVL) beams positioned and connected to the tops of two 18-inch wide shear wall panels at the building’s east and west corners. These panels are solid columns manufactured from wood composite with U-shaped steel brackets at their base, and they are attached with 7/8-inch by 4-foot bolts through the 4-inch concrete slab to the middle of the foundation’s footing. This fortification creates a stiff wall to keep the structure from racking in high winds.

Visible here is the south wall with its double LVL beam framing connected to the southeast corner’s 18-inch shear wall panel.
Framing & Sheathing
After installing a foam sill sealer where the bottom of the sole plate meets the concrete slab, we used OSI Quad polyurethane caulk to seal the gap between the interior 2x6 wall framing and the exterior plywood sheathing where they both meet the concrete slab.
The rest of the framing is constructed with 2x6s, and all exterior walls are sheathed with 3/4-inch plywood. We chose plywood over OSB because it expands and contracts less and grabs screws better. We taped all of the sheathing seams with the 3M flashing tape. We used expanding foam to fill in areas of the ICF forms that were damaged during the backfilling process.


Rim Joist Insulation & EPS over LVL Headers
We filled the rim joist between the first and second floors with 6-7 inches of polyiso spray foam. We used this product only in areas that were difficult to insulate with cellulose, as it has a high global warming potential.
We installed 2-inch EPS high-density foam insulation over all the LVL window headers, diminishing thermal bridging.

6-7 inches of polyiso spray foam insulates the rim joists, while 2 inches of EPS covers the LVL headers.
Cellulose Insulation, Mechanical Chase & Air Barrier
Our insulation contractor blew 5.5 inches of dense-packed cellulose (shredded newspaper) into the 2x6 stud wall cavities. Over the studs we installed a 1.5-inch electrical chase using 2x3-inch furring strips placed horizontally to diminish opportunities for thermal bridging. This chase houses 1.5-inch deep electrical boxes (shallower and wider than standard boxes) and boosts the relative R-value by avoiding cold spots within the cellulose layer.
We insulated this electrical chase with mineral wool (made from recycled steel slag and basalt rock) and covered it all with Certainteed Smart Air Barrier, which allows any moisture that enters the wall system to migrate back into the house. The cellulose and mineral wool combined have an R-value of about 26.5.


Testing for Insulation Voids
Before installing our final EPS foam insulation layer, we wanted to confirm that all this attention to detail was paying off. On a 22°F March day, we temporarily heated the building so we could use an infrared camera to detect any insulation voids in the 2x6 stud wall cavities. The thermal images showed temperatures as different colors—the insulated wall cavities glowed warm yellow, while the studs were a deep pink (showing thermal bridging).
In contrast, two uninsulated stud bays that had been accidentaly overlooked in the filling process were a chilly, dark indigo. At this point in construction, the differential between the outdoor temperature and the temporarily heated indoor air also showed the cold concrete slab, as we did not heat the building long enough to warm the slab.

Testing for insulation voids with an infrared camera.
Wrapped in a Blanket of EPS Foam

The southern elevation’s EPS foam layer installation nearly completed, with only the last, precisely cut pieces around the windows and door yet to install.
One advantage of our wall system is that the home’s last layer of insulation—4-inch thick sheets of high-density EPS foam—creates an ideal, uninterrupted thermal insulation plane from the base of the footing to the roof trusses. This continuous EPS foam layer serves to prevent thermal bridging through the 2x6 studs as well as the door and window frames, which are thermally weaker than their glazing.
Window Over-Insulating
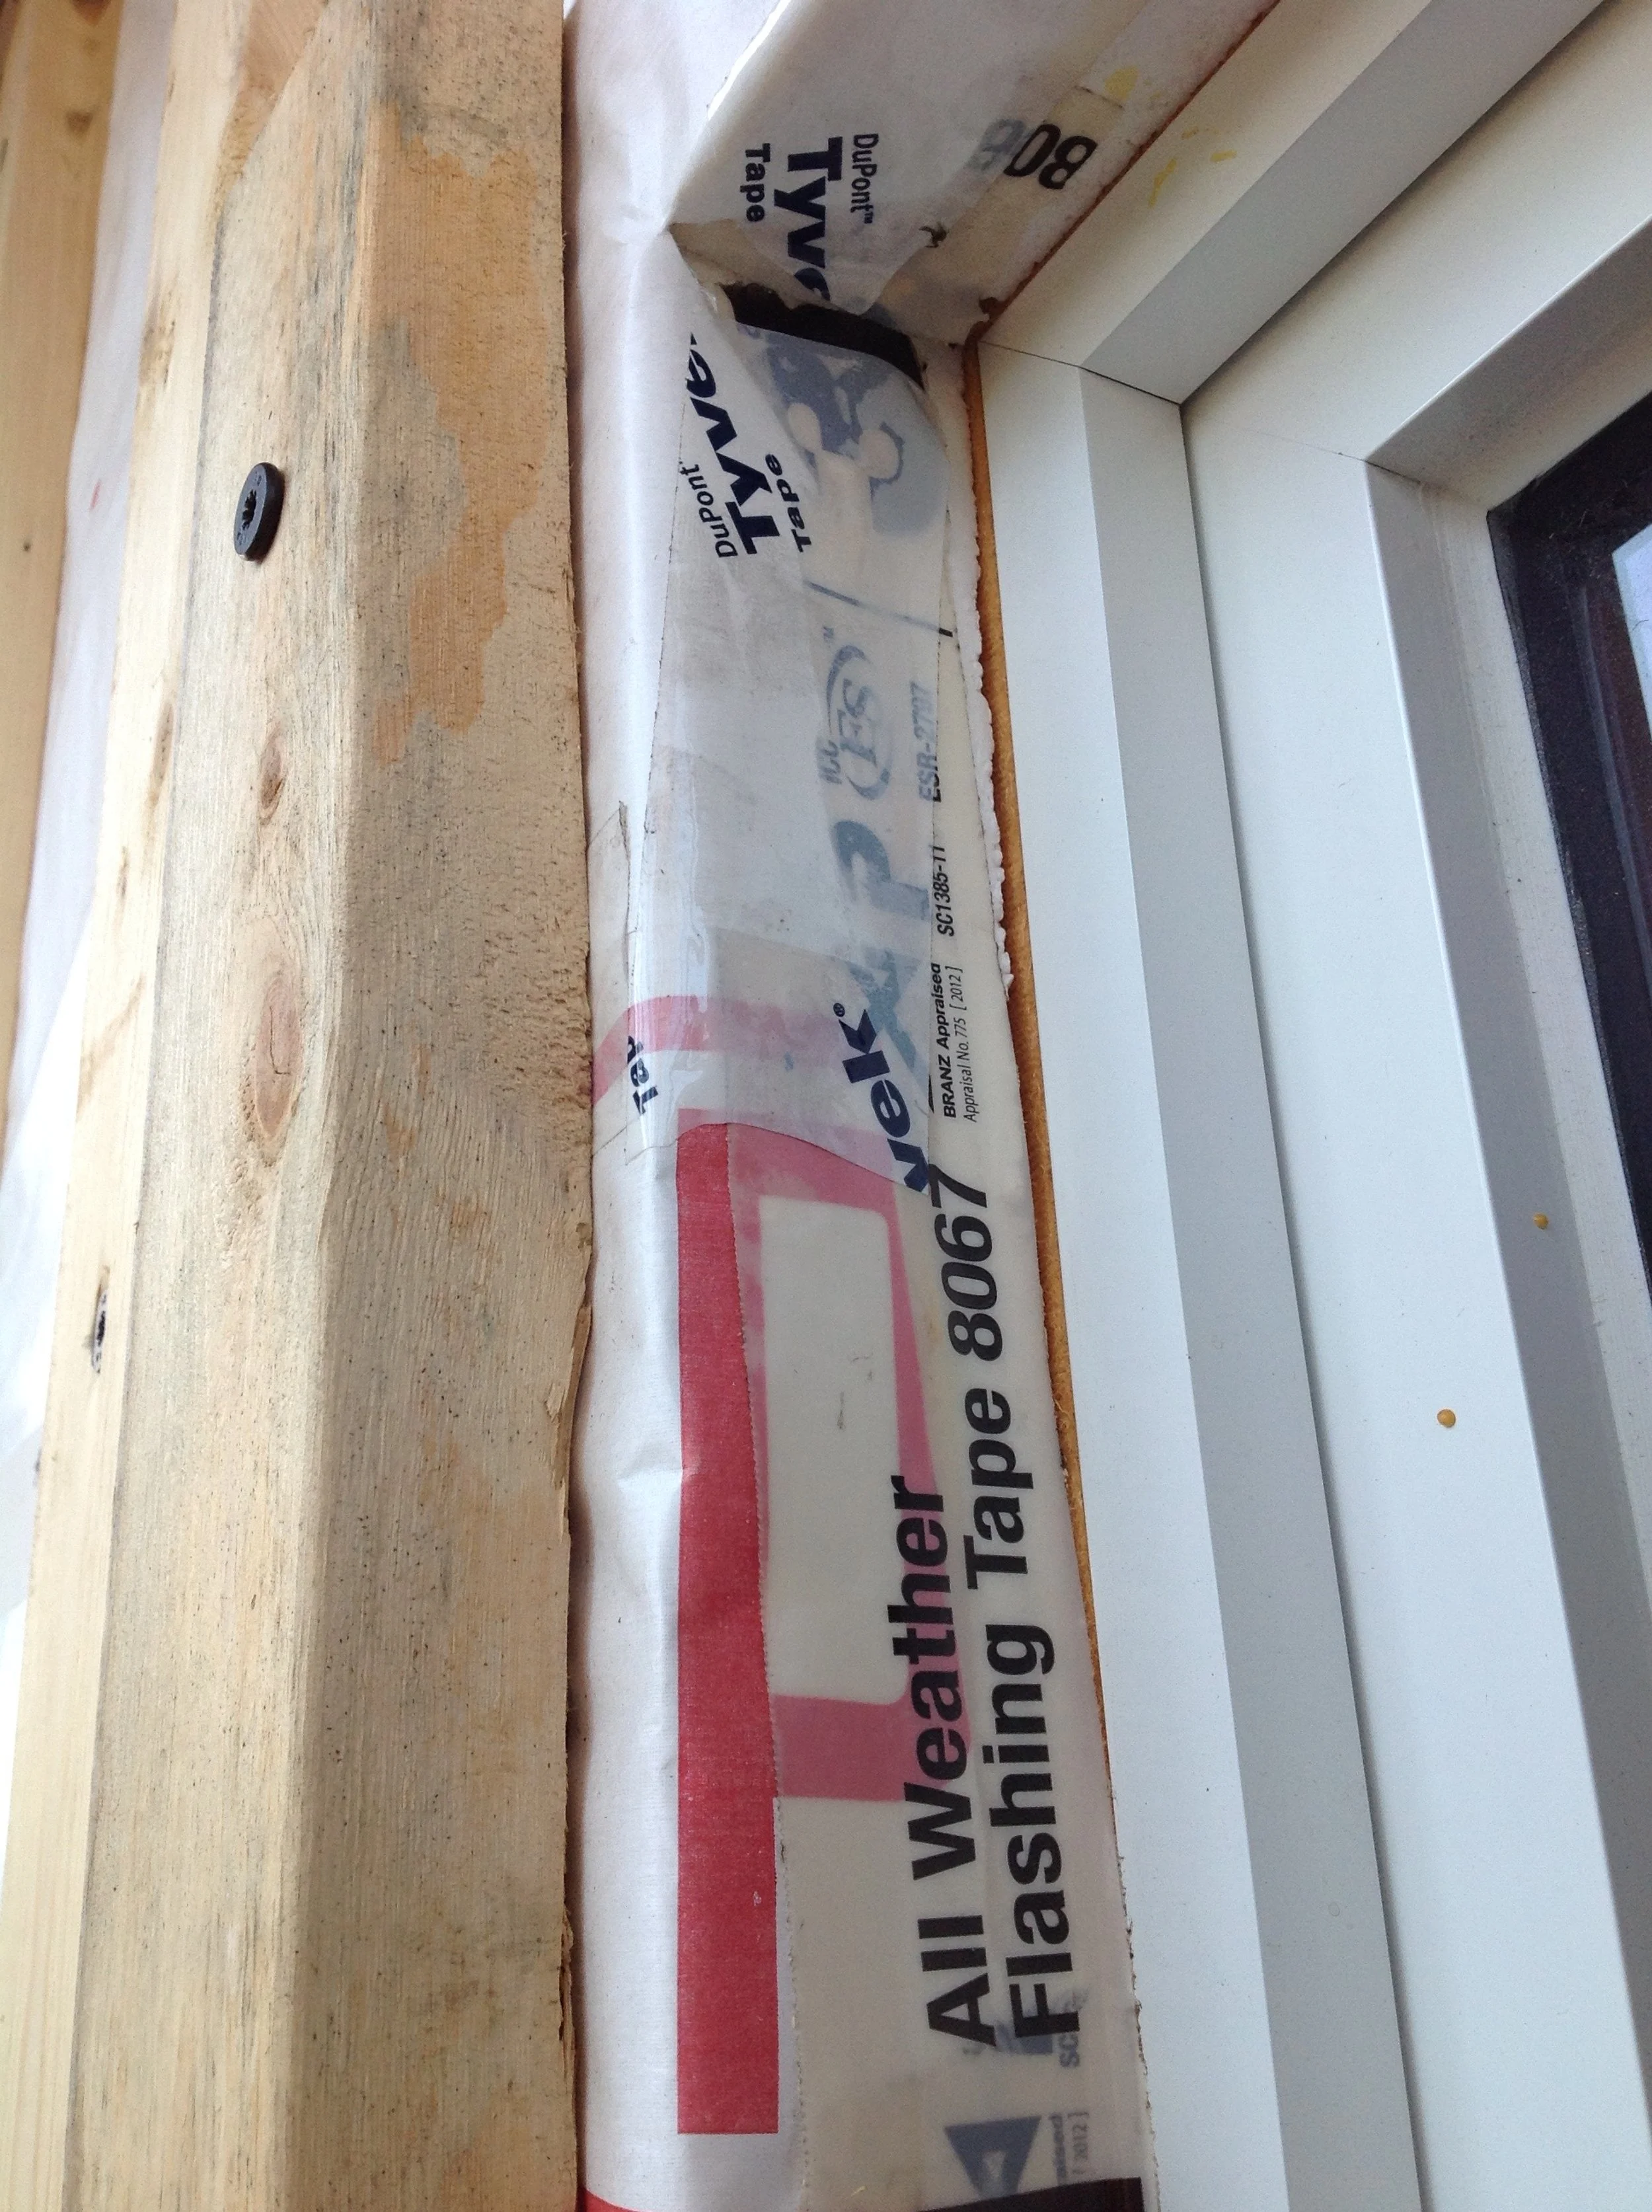
This next photo shows the important detail of over-insulating the door and window surrounds. For maximum accuracy we used a table saw to cut the remaining few inches of EPS foam covering each frame. This over-insulating greatly diminishes thermal bridging (explained further in the next section: Super Performance Doors & Windows). We also spray-foamed the space between the window frame and the rough framing and taped each seam with the 3M flashing tape. (Note: This photo was taken as a reminder to double check the seams and reseal, as needed here—the flashing tape needs to seal the joint between the foam/weather barrier and the white window cladding.)
The 4-inch EPS insulation layer adds an R-value of about 19 to the wall system. Another advantage is that the EPS allows for a relatively thin overall wall thickness—14.5 inches in our case—which minimally impacts both the sunlight coming into the house and the views to the outdoors.
EPS Installation Challenges
That said, the EPS was also incredibly labor intensive to install—a balance we readily accepted while planning, but one we may have reconsidered had we realized all the construction implications.
The challenge was figuring how to attach the EPS foam within the wall system. We cut 4-inch thick sheets to fit, glued them to the plywood sheathing, then temporarily screwed them to the plywood with 6-inch screws and plastic anchoring washers. Then we spray-foamed any cracks, taped each seam, and covered the EPS with Tyvek House Wrap weather barrier. Then, to attach the EPS permanently, we installed 2x4-inch vertical rainscreen strapping over it with 8-inch structural screws through the foam, securing it to the framing.
In the end, we are thrilled with our fabulously robust and well-performing wall system. When looking out our vertically oriented windows from an angle, the relatively thin walls allow wider viewing than a thicker wall system would have. But, if we would have embraced the idea of having thicker exterior walls, it would have been easier, cheaper, and less labor intensive to build a double wall system.


Covering the east elevation’s dormer with 4 inches of high-density EPS foam.
Weather Barrier & Rainscreen
The rainscreen ensures that the wall system stays dry by providing a channel for constant air movement under the siding. This protects the building’s structural integrity in two ways: it allows the siding material to dry out if water gets behind it, and it allows any moisture that may migrate from the home’s interior to escape.


Diagram from buildingsurveyors.co.nz
Testing Airtightness
Earlier in the construction process, once our super high-performance windows were installed, an energy technician performed a blower door test to measure the envelope’s airtightness. We sealed around the construction doors and temporarily installed a fan in the back doorway. This fan depressurized the building, pulling the higher pressure outdoor air into the house through any unsealed cracks we might have missed. The technician measured air leakage using sensors and a software program to determine the building’s air changes per hour (ACH).
Minnesota’s 2015 code requires no more than 3.0 ACH at 50 pascals of pressure.
Our house tested at 0.56 ACH—below the 0.60 ACH Passive House standard!
These measurements were extremely reassuring as we had yet to install the exterior EPS foam layer, interior drywall, and double weatherstripped exterior thermal doors.
Siding & Trim
The siding material is a combination of traditional cedar shingles on the top half and cedar lap siding on the bottom, both harvested from sustainably managed forests. All the exterior trim was made from Miratec, a durable composite made from wood byproducts. We stained the siding and painted the trim.

Cedar lap siding on the bottom and cedar shingles on the top (east elevation).
Wall System Layers, Inside to Outside
14.5 INCHES THICK, ABOUT R-45:
1/2-inch drywall
CertainTeed MemBrain smart air barrier and vapor retarder
1.5-inch interior electrical service chase filled with mineral wool
2x6 inch stud framing filled with 5.5-inch dense-packed cellulose
3/4-inch plywood sheathing, caulked and taped
4-inch EPS foam attached with 6-inch screws, foamed and taped
Tyvek House Wrap weather barrier, taped
1.5-inch rainscreen attached with 8-inch structural screws
Cedar clapboards and machine cut shingles